Communications screen
The communications screen on the Focus portal will be the main page used for interacting with any of your data. This page gives you access to the powerful and intuitive Focus search (3), quick access to your latest communications, playlists, saved search and much more.
Main screen overview
When you first load the communication screen the portal will automatically display the latest communications that your user has permission to see (see People - Staff for more information on permissions)
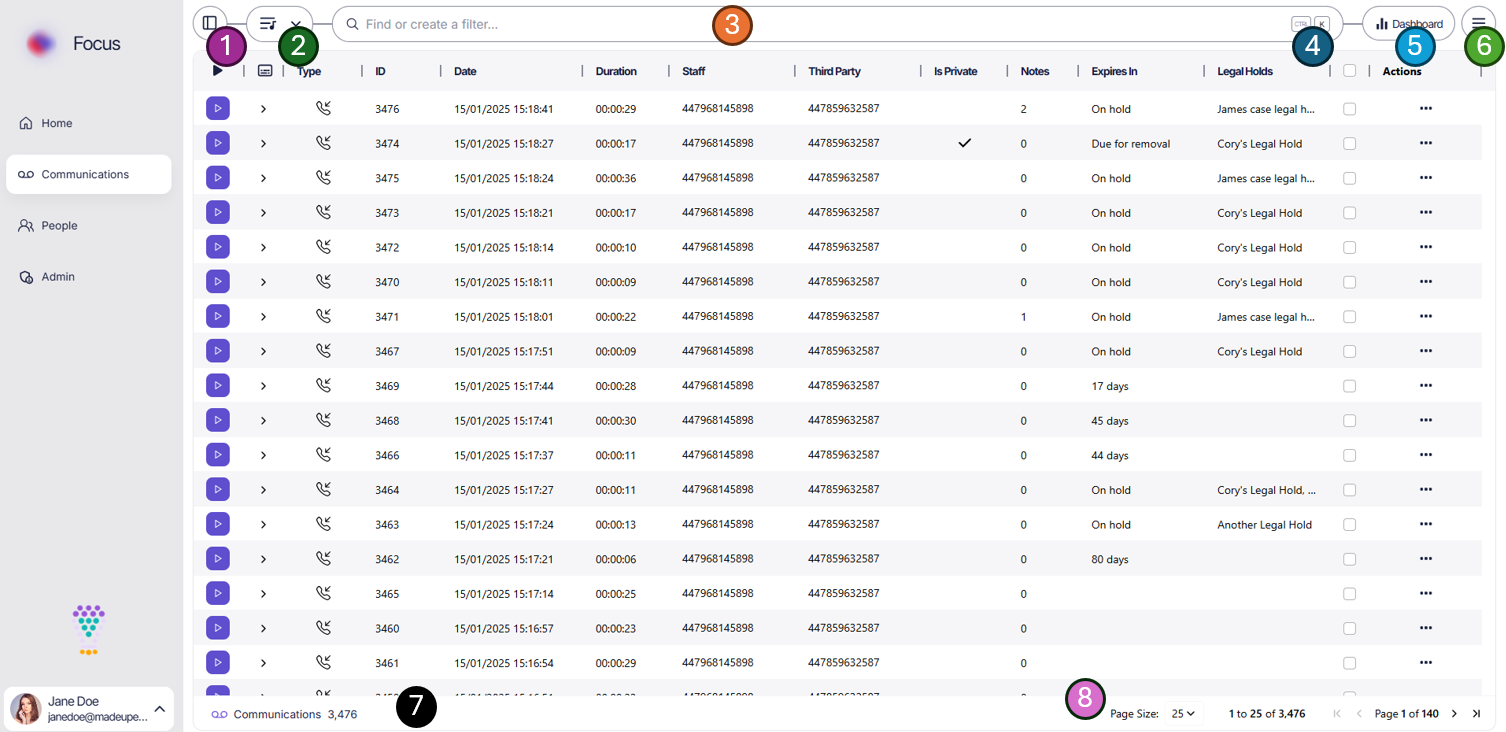
- Change the size of the menu bar (See Home - Menu options)
- Playlists - View current playlists and jump to a specific playlist
- Search - The Focus search bar lets you quickly find any communications you have access to
- Keyboard shortcuts - The search can be navigated via mouse or keyboard
- Dashboards - A link to the quick view dashboard
- Menu options - Get the latest communications or update your current filters with new results
- The total number of communications returned from your filter. When you first open the page this will be all active communications your user has permission to view. - See Results Grid for more information
- Page options and size - See Results Grid for more information
Search
The search within the Focus portal is designed to be as use friendly as posable. Everything can be navigated via the mouse or keyboard shortcuts allowing for super fast filter access.
![]()
To open the search simply click into the search bar (1) or press Ctrl + K on windows or Cmd ⌘ + K on a Mac (2).
Keyboard shortcuts are always shown next to the text within the button used for mouse navigation. Keyboard shortcuts a 100% optional but should speed up navigation around the application.
Once the search is open, the first section within the search dropdown is a list of categories. The options shown will depend on your users policy but a common example is shown below.
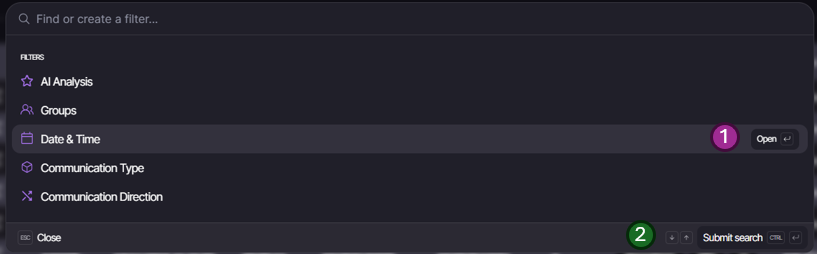
- Hovering over a categories will show you the action that would be performed upon a click of the mouse. Note: you can click in any location on the highlighted row to perform this function. The keyboard shortcut is shown next to the button text.
- Other options are shown in the bottom bar of the dropdown. The highlighted action is always the default but all keyboard shortcuts are shown. For example the ESC will close the menu and Ctrl + Return or Cmd ⌘ + Return will perform the current search.
Menu options
The menu options provide access to page options.
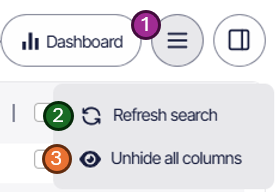
- Refresh search - Refresh the current results for the current search
- Reset grid layout - Returns the gird layout to the default layout (Note: All columns will be shown again)
Search options
Inclusive and or Exclude
Whenever posable all search categories will allow for both Inclusive and/or Exclusive use of the selected categories however some items like date range only allow inclusive selection.
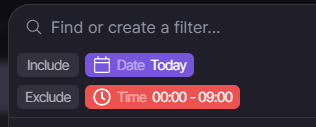
As an example, you may want to include calls from Yesterday but exclude any calls before 9am. Each section of the search is built up under the Include (purple) or Exclude (red) sections and show a representative color.
Search categories
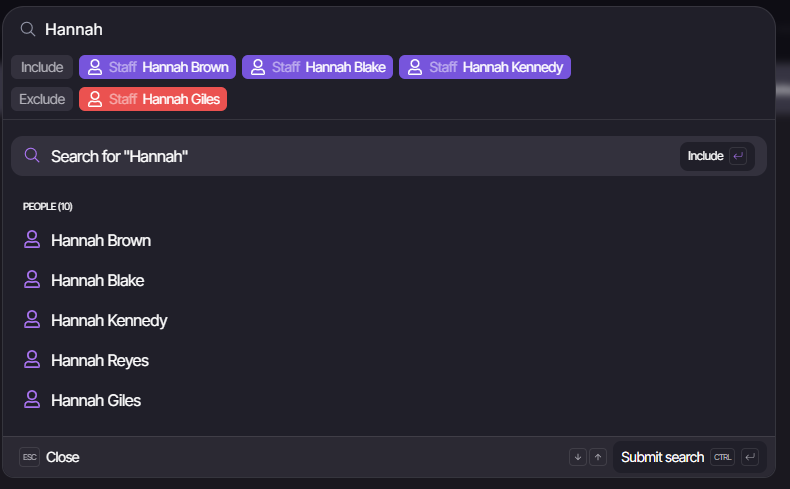
All search categories can be selected via the dropdown lists or a contextually aware search built into the dropdown. When you start typing the Focus search will provide any matching answers across any of the below catagories. This super powerful feature allows power users to jump directly to a tag, a member of staff or even a time range.
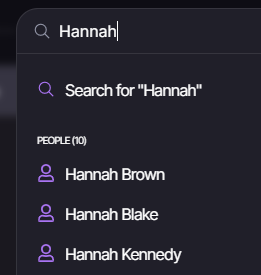
In the above example, after typing Hannah the context search has found a few people named Hannah and also has suggested a free text search on the word Hannah
AI Analysis
Under this section users can filter for any tags or AI analysis preformed on any of the communications that are currently enabled on the account. All tags in this category can be included or excluded and they stored within sub groups.
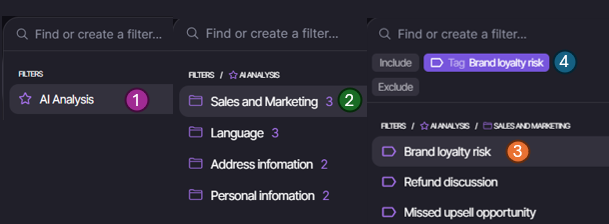
- Select the main category, in this case Ai Analysis
- Select the sub category
- Select the Tag / Analysis you want to find relevant conversations for
- Select if you wish to Include or Exclude this tag
Groups
Groups are any groups found under the Staff sections of the People administration sections. They let you quickly included or excluded groups of calls made by Staff members.
For example you may wish to exclude the complaints team from your search results.
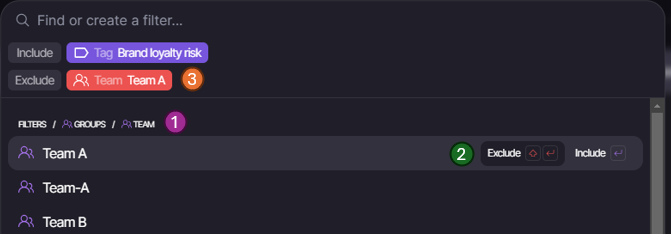
- Select the main category, in this case Groups followed by the sub categories
- Select our team we wish to Exclude in this example
- Our team is now added to our search filters as an exclude option
Date & Time
Date and time is a very common search criteria. As well as being able to select custom ranges for dates the Focus portal also allows quick access to comment rangers like Today, Yesterday and This week.
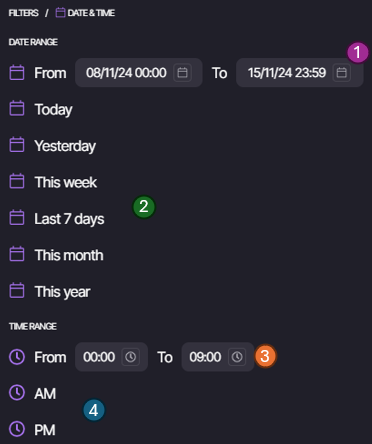
- Selecting the dates in this section will let you select a custom data range. e.g. just tuesday this week, or a few days last week
- Quick date range options
- Selecting the time in this section will let you select a custom time range. e.g. exclude all communications before 9am (00:00 -> 09:00)
If selecting a specific date range (1) you can optionality add a start or end time to the range as well, if not time range is added then midnight is used by default.
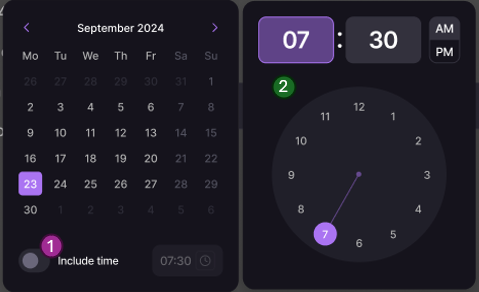
- If you wish to add a start/end time (note this is not the same as a time range) toggle the Include time switch
- A second popup will ask you for the start/end time
Time range is independent of date range. If you are looking at communications over more than one day, then the time range will apply to each day in that range. For example: Include time range of 09:00 -> 10:00 with a date range of Last 7 days would result in any communications that happened between 9am and 10am in the last 7 days.
Communication Type
Communication type enables the addition of filters for different types of communication. All types can be included or excluded.
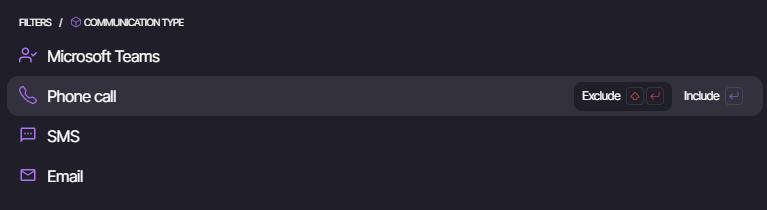
Only communication types provisioned on your account will show in this list
Communication direction
Communication direction allows a filter to be added that will show only Inbound or Outbound communications. This is defined from the recorded staff members point.
People
People can be searched for via the main search at the top of the Focus search dropdown. Once a few characters have been entered, any matching people (staff or external) will be returned and can be included or excluded from the search results. It is also possible to include or exclude multiple people in the same filter.
Free text
Free text allows for a vectorized search to be conducted across all text data within the results. The words or phrase added would be search over all transcripts, metadata, people and extracted data.
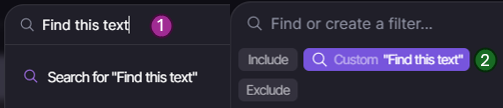
- Enter the text you wish to search on
- Select the text and it will be added as a custom search filter
It is recommended to do a narrow date range search when doing free text result searching to avoid large wait time
Saved searches
Once a search has run it can be saved and used again at a later date.

- Create your required filter
- Press the save icon within the task bar
Once a set of search filters have been saved, the latest saved search filters show on the bottom of the search drop down for easy access.
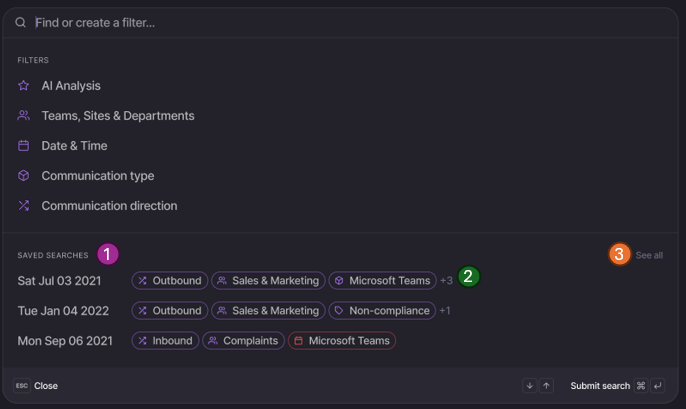
- Once any search is saved this section will show the latest saved searches
- Select a saved search to rerun the filters
- Pressing See all will load the full list of any saved searches
If you create saved searches with dynamic items like groups or quick date ranges (e.g. yesterday) then the saved search will also be dynamic and return the correct results at runtime.
Results grid
Grid features
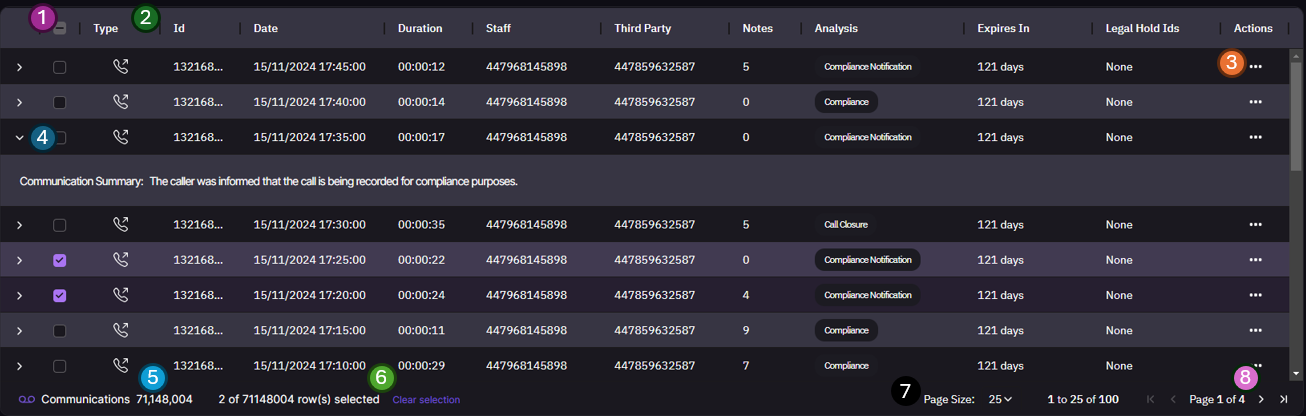
- Tick or un-tick all communications in the current view. Tick boxes are also on each row if you wish to select individual rows
- Grid column headings
- Playback - Pressing the play icon will begin playback of the communication.
- Type - The communication type (e.g. Teams meeting, phone call, sms)
- ID - A unique reference for this communication
- Date - The date and time that the communication was started. Note this is stored by us in UTC then updated to your browser timezone for display.
- Duration - The length of communication in HH:MM:SS
- Staff - The information about the staff member. Depending on what data has been added to the People - staff section of Focus. If we know the persons name, then this will be shown as a priority over just the number
- Third Party - The information about the 3rd party in the communication. Depending on what data has been added to the People - external section of Focus. If we know the persons name, then this will be shown as a priority over just the number
- Is Private - This shows that the call has been marked as a private call. If a user still has a play button then they have the correct policy allowing playback of this private call. If not the play button will show a padlock and playback is not possible.
- Note - The number of comments / notes about this communication
- Analysis - Any Tags that have been assigned by the AI or via comments to this communication
- Expires In - Time till this communication is automatically removed from the platform
- Actions, any actions you would like to perform on this call. E.g. Download, update retention dates, etc. (See Actions for more information)
- Reveal communication summery. This will allow you to see a short 100 word summery of the communication. This can help to find a communication if you are not sure the exact time or detail of the call
- Total number of communications returned by the current search filters
- If you have any rows ticked, this section will show and confirm how many are selected. See Multi-select for actions that can be performed on multiple rows.
Clicking on the play button within the grid will start playback of that communication (if audio is supported). You can also view a transcript and the metadata via the Conversion Sidebar.
Grid layout
The grid can be updated to show just the columns you wish to view and in the order you want to see them. The grid layout can be reset back to its default at any point by selecting the option from the menu
Hide columns
Hovering over any of the columns in the grid will display a closed eye icon. Pressing this will hide the column from view.
![]()
Reorder columns
Holding down with the left mouse button on any column will allow you to drag that column to a new location in the grid. Nice!
Resize columns
Hovering over the line (1) between each column will let you resize each column. If a column becomes too small to display the values needed it will show the first section of the value followed by three dots (2) to indicate more text is hidden

Single communication actions
Actions are possible at both row level and multi row level, function slightly differently depending on what is selected.
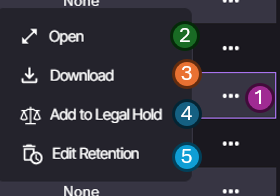
- Action button - On the far right of the grid for each row you can click the more or three dots icon. This will load the actions menu for this communication
- Open - This opens the communication in full screen mode
- Download - Allows download of this single communication
- Add to Legal Hold - Add this communication to an legal hold. More information about Legal holds can be found in the Legal holds section
- Edit retention - This allows you to update the communications retention date. More information about retention dates can be found under the Retention section
Multi select actions
When more than one row is selected a new "Multi Actions" button will appear at the top of the grid.
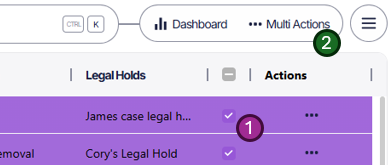
- Select more than one row
- Select "Muti-Actions" button
The multi actions available are:
- Add to Legal Hold - Add all selected communications to the same legal hold. More information about Legal holds can be found in the Legal holds section
- Edit Retention - This updates all selected communications retentions dates at the same time. More information about retention dates can be found under the Retention section
Playlists
Playback
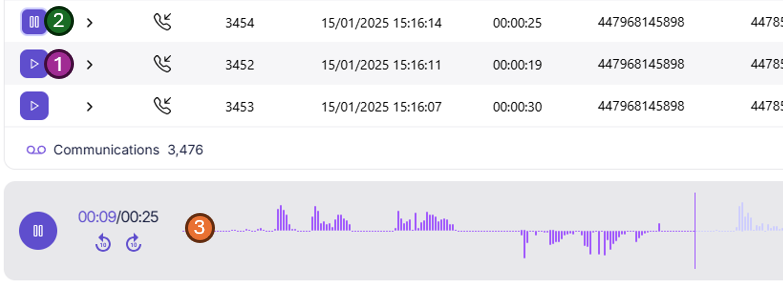
Communications with audio can be played back from within the communication search screen. Simply clicking the (1) "Play" icon ![]() on any row within the playback grid will start playing that communication. If this is the first playback the playback bar will load beneath the grid (2). The selected calls play icon will also swap to a pause button (3).
on any row within the playback grid will start playing that communication. If this is the first playback the playback bar will load beneath the grid (2). The selected calls play icon will also swap to a pause button (3).
Playback bar
The playback bar on both the search screen and communication detail view function the same way.

- Play/Pause button - Play or pause the currently selected communication
- Timer - The current time being played and the full length of the communication
- Skip buttons - Quickly skip forwards or backwards 10 seconds
- Wave form - A visual representation of the communication. If recorded in stereo, the recorded user (Subscriber) will be on the bottom of the waveform. You can quickly see any cross talking or silence and jump to or over such sections. Some helpful labels are displayed to help identify who is who, they can be disabled via the playback settings button (10).
- Comment marker - A comment that has been added at a specific timestamp. Clicking the comment will show the sidebar and load the comment information.
- Comment region - A comment that has bee added across a time range or region of the communication. Clicking the comment will show the sidebar and load the comment information.
- Playback location - The current playback location, this bar will move along with the audio file while being played.
- Jump marker - If you wish to jump the playback to a specific section of the communication a "jump bar" will show the time you will jump to before clicking on the playback bar.
- Load communication detail view - Load the currently playing communication in full screen (details) mode.
- Playback bar settings - Open the sub menu to change options on the playback bar.
- Show or hide the communication sidebar - Opens or closes the right hand sidebar for access to the metadata data, transcript and comments
- Close playback bar - This button will close the communication playback bar and stop the audio from playing, retuning the grid to full hight
Playback bar options
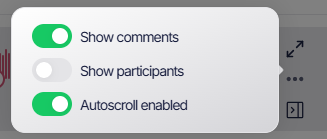
Options for the playback bar can be changed within the playback bar options menu.
- Show comments - This turns on or off comments and regions on the playback bar
- Show participants - Show or hide the participants labels on the playback bar
- Autoscroll enabled - This setting lets you disable the auto scroll of the transcript in the Conversion sidebar.
Conversion Sidebar
The conversion view sidebar gives you quick access to all the data about a communication without having to leave the communications grid. This is perfect if you are flicking through communications or trying to find something specific. If you need more space you can swap to the detailed full screen view quickly via the button in the top right.

The Conversion Sidebar can only be opened if a communication is being played so if you cant see the above button, select a communication first. Once open it will stay open for each playback you do, you can change this by clicking the button again.
Transcript
If transcription is enabled on your account you the first tab will be the transcript of the recording.
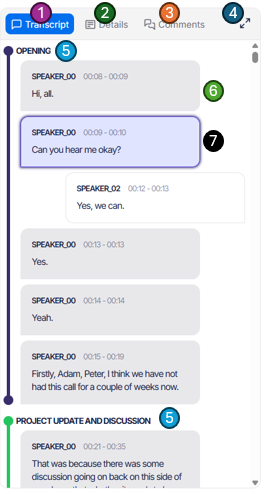
- The tab bar - With transcript selected.
- Communication details - Swap to the details (sometimes called metadata) about the currently selected communication. See Metadata section below for more information about this.
- Comments - View or add comments about this communication. See Comments section below for more information about this.
- Full screen toggle - Want more space, swap into full screen view. Most of the options are the same in this view but with more space to follow the transcript and type notes. See Communication detail view section below for more information about this.
- Transcript segments - The AI will automomaticly create segments for each transcript. This lets you quickly jump over the "Hello, how was your weekend" opening section and get to the "Main section" of the communication.
- Transcript data - The main transcript data. This will show the subscriber on the left and other people in the communication on the right. Each box is selectable and playback will jump to that part of the call.
- Currently playing section - The currently playing part of the communication is highlighted in a blue glow. If "Autoscroll" is enabled under the Playback bar options then the transcript will scroll along as it plays.
Metadata
The Metadata tab will show any metadata Focus has about the communication.
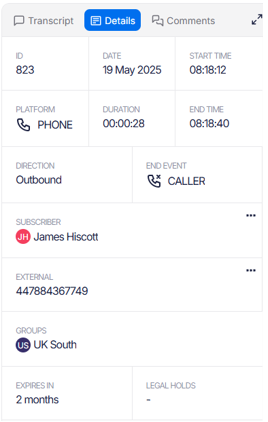
This data will change slightly depending on the type of call but Key highlights include:
- ID - A unique reference to this communication within the Focus platform.
- Origin ID - An ID given to Focus by the recording solution.
- Date and time information - Information about how long and the communication took place.
- From and To - Information about who the call was from and to. If Focus knows the name for the person this will be displayed instead of the number/guid. This information can be set via the 3 dots menu (...) of via the people screen.
- Groups - Any groups the communication is tagged with (Searchable).
- Retention information - When the communication is due to expire and if its currently on any legal holds.
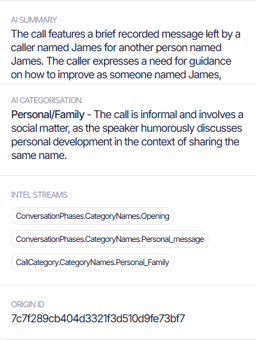
- AI Data - All the AI data about the communication.
Any of the data on the metadata screen can be used within the search to find more communications matching similar data. See Search options for more information.
People options
Each person or party within the communication has a number of options accessed via the three dots menu on the metadata grid.
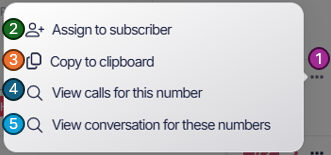
- Menu - Pressing this button will open the menu options
- Assign to a Subscriber / External - This option will let you assign the endpoint directly to a person from within the grid. Note: The person must already exist via the People screen.
- Copy to clipboard - This lets you quickly copy this number or endpoint to clipboard for use later in the search or other screens
- View communication for this number - Automatically add this number to the search as a filter, no need to copy and paste
- View communications for these numbers - Automatically search for communications between the two numbers to see a full history of communication between the two endpoints.
Multiple participants
![]()
If more than one person is involved with the communication then you will see a little count and arrow to scroll thought the participants .
Comments
The comments section lets you add comments to the communication. Comments can be one of 3 types:
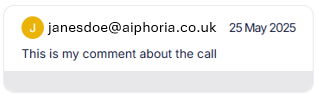
General comments
A general comment about the call, this is added via the comments section. Type the comment you wish to add and press "Submit".
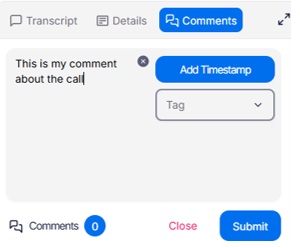
The comment will be added with your username and timestamp automatically.
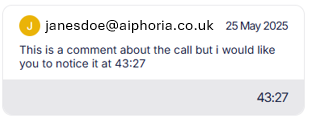
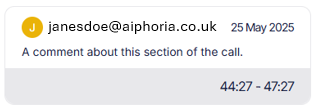
Marker or Region comments
This comment will add a marker (single dot) or region (span) to the playback bar along with the comment.
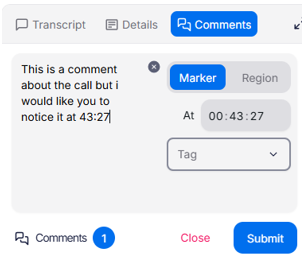

To add a timestamp comment:
- Start by adding your comment in the same way by typing the comment
- Next, select the Add Timestamp button.
- Select Region or Marker
- The current playback time will be added by default to the start time of the marker or region. Update this as you wish
- Press save and you will see your comment added and the marker or region on the playback bar.
Selecting a Region or Marker on the timeline will open the comments section and highlight the selected comment within the Conversion sidebar.

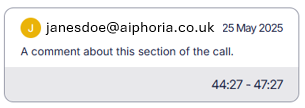
Forced comments
If forced comments is enabled via the administration section of the Focus portal then a comment must be added before playback can begin.
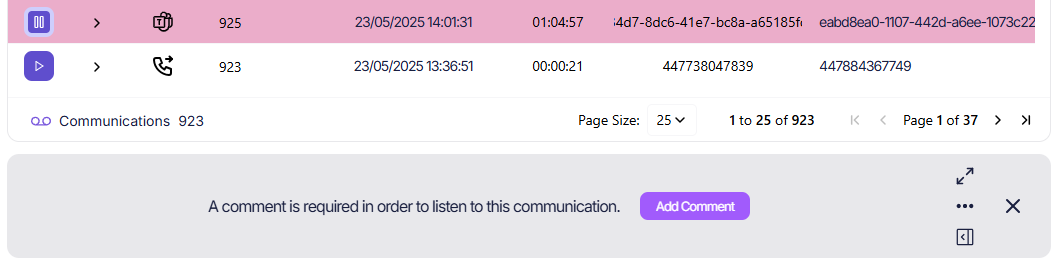
The playback bar will change to show the requirement and a button will ask the user to Add a comment
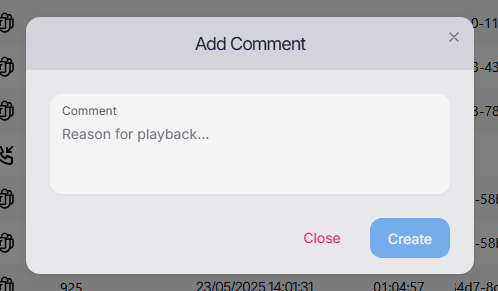
A windows will popup to ask for the comment, once completed the call playback will begin as normal.
If you select the same call again, within the same session, you will not be asked for a second comment but this will still cause an audit event for the second playback request.
Communication detail view
The communications detail view can be opened via the actions menu on the communications grid, the full screen button on the playback bar or the full screen button on the Conversion sidebar.
![]()
Once open the screen works the same as the Conversion sidebar but with a few additional sections.