Teams recording
Overview
Focus is a fully integrated recording partner with Microsoft Teams, providing comprehensive recording solutions that cater to both compliance requirements and convenience needs. Our Teams recording integration captures all forms of communication within the Microsoft Teams ecosystem, ensuring organizations can meet regulatory obligations while maintaining complete visibility into their communications.
Recording Options
Compliant Recording
Our compliant recording solution is designed for organizations in regulated industries that must adhere to strict compliance requirements:
- Mandatory Recording: Automatically records all specified communications without user intervention
- Tamper-proof Storage: Immutable recordings that meet legal and regulatory standards
- Retention Policies: Configurable retention periods to meet industry-specific requirements
- Audit Trails: Complete logging of all recording activities for compliance reporting
- Data Integrity: Cryptographic verification ensures recordings haven't been altered
Convenience Recording
For organizations seeking a little more flexibility and user control over their recording practices you can have all the above benefits but recording can be set to only record what is required from the supported communication types.
Supported Communication Types
Microsoft Teams Meetings
- Scheduled Meetings: Record planned meetings with full participant audio and video
- Ad-hoc Meetings: Capture spontaneous meetings and quick discussions
- Webinars and Live Events: Record large-scale presentations and broadcasts
- Breakout Rooms: Individual recording of breakout room sessions
- Screen Sharing: Capture shared content and presentations
PSTN Call Recording
Our solution extends beyond Teams meetings to include traditional telephony:
- Inbound Calls: Record all incoming PSTN calls routed through Teams
- Outbound Calls: Capture outgoing calls made via Teams Phone System
- Bidirectional Recording: Option to record both inbound and outbound calls simultaneously
- Direct Routing: Support for calls made through Direct Routing configurations
Key Features and Benefits
Features
- Seamless Integration: Native integration with Microsoft Teams infrastructure
- Real-time Processing: Immediate availability of recordings after call completion
- Multi-format Support: Audio and video recordings in industry-standard formats
- Advanced Search: Find recordings using metadata, participants, keywords, and date ranges
- Scalable Architecture: Handle enterprise-level recording volumes with consistent performance
- Global Availability: Support for Teams deployments across multiple regions
- Mobile Support: Record Teams calls and meetings on mobile devices
Benefits
- Regulatory Compliance: Meet industry requirements for communication recording
- Quality Assurance: Monitor and improve customer service interactions
- Training and Development: Use recordings for employee training and coaching
- Dispute Resolution: Provide accurate records for resolving conflicts or misunderstandings
- Business Intelligence: Extract insights from communication patterns and content
- Risk Management: Maintain comprehensive records for legal protection
Setup process
Getting Started
Setting up Teams recording with Focus is straightforward and can be configured to match your organization's specific recording policies. Whether you need compliant recording for regulatory purposes or convenience recording for business optimization, our solution adapts to your requirements.
Requirements
To setup the required policy option you will need the below:
- An Azure global admin user account or Teams global admin user account
- A Focus Super user account
Automated script or manual steps.
An automated powershell script has been created with all the below steps done for you. If you prefer to do each step one by one simply skip to the Manual section below and follow along.
Automated - First setup
There are two options for automated setup:
- You can run the script directly with the below command via an Administrator Powershell:
Set-ExecutionPolicy Bypass -Scope Process -Force
Invoke-RestMethod "https://uk.help.aiphoria.net/scripts/Setup-AiphoriaTeamsRecorder.ps1" | Out-File Setup-AiphoriaTeamsRecorder.ps1
.\Setup-AiphoriaTeamsRecorder.ps1
- You can download the file, read over it and run it manually.
- Download the file from this link: Download Teams Setup PowerShell Script.
- Then open a Powershell Administrator prompt within your download folder and run:
Set-ExecutionPolicy -ExecutionPolicy RemoteSigned -Scope Process -Force
.\Setup-AiphoriaTeamsRecorder.ps1
You can now add the users to the group
Manual - First setup
Bot enablement
The first time you enable teams recording (of any type) your azure admin user will need to allow the Focus portal and recording bot to connect to your Microsoft instance.
If you are in any doubt about the account you are currently logged in as, please use an incognito window to ensure a fresh login.
You can select between Production bots and accounts or POC / Trial / Sandbox bots and accounts
- Production accounts
- POC / Trial / Sandbox accounts
The below URL is for production accounts and should be used unless told otherwise.
- Follow the below link. Ensure you use a browser logged into the correct tenant you wish to connect to Focus for recording.
*** Launch Microsoft Admin Consent Flow for Production accounts ***
The below URL is for POC or trial accounts. Please only use this registration link if you have been asked to do so by your onboarding team.
- Follow the below link. Ensure you use a browser logged into the correct tenant you wish to connect to Focus for recording.
*** Launch Microsoft Admin Consent Flow for POC / Trial / Sandbox accounts ***
-
If you have multiple Microsoft accounts, select the correct Microsoft global administrator account or login as normal.
-
Accept the permissions required to allow the Focus bot (Powered by Oak Innovation) to subscribe to your tenant

- Once successful you will be redirected to a success page. You can now continue with the below policy and user setup.
PowerShell configuration steps
Powershell setup
The following steps must be carried out in PowerShell
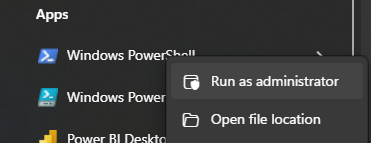
- Open PowerShell as an administrator.
- Run the bellow command to allow remote scripts to run (this only changes your current powershell session)
Set-ExecutionPolicy -ExecutionPolicy RemoteSigned -Scope Process
- Install the Microsoft Teams Powershell module (You only need to install the module the first time it is run)
Install-Module MicrosoftTeams
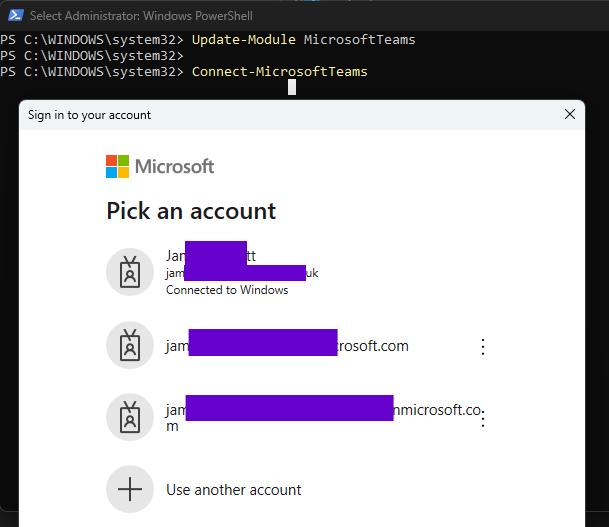
- Next we just need to make sure the teams module is up to date (if you didn't have this installed it probably is, but the below makes sure)
Update-Module MicrosoftTeams
- Connect your PowerShell window to your Teams Microsoft Teams Administrator account. Once run you should be prompted to login to the correct Microsoft account
Connect-MicrosoftTeams
This must be the same account as you authorized the Teams Bot under the First steps section above.
Create the compliance recording policy
Once everything is updated and PowerShell is linked to Teams, it is time to create the policy itself. This step effectively installs the recorder bot into your Microsoft Teams instance.
- For the first step we need to add a few specific values into the below command. For all examples we are going to use the company name "MegaCorp":
- Production accounts
- POC / Trial / Sandbox accounts
The below URL is for production accounts and should be used unless told otherwise.
- UserPrincipalName: This the recording bots "name". It needs to be an email address with the same domain name as in your Microsoft Teams instance. This is recomended to be your "onmicrosoft" address but can be any domain in the account. For example “focusrecordingbot@yourdomain.onmicrosoft.com”.
- In this example we will use: focusrecordingbot@megacorp.onmicrosoft.com
- DisplayName: This is the name for the recording bot, it doesn't show to any users so can anything you wish. We recommend its the same as the part before the @ in the UserPrincipalName.
- In this example we will use: FocusRecordingBot
- ApplicationId: For production recording this will always be 767f5014-af07-4861-805b-6f1fcb857e90
Once you selected a name as above please run the below command, replacing the UserPrincipalName and DisplayName with your selected names via the same PowerShell window used during setup:
New-CsOnlineApplicationInstance -UserPrincipalName focusrecordingbot@megacorp.onmicrosoft.com -DisplayName FocusRecordingBot -ApplicationId 767f5014-af07-4861-805b-6f1fcb857e90
- Once the command has completed, the application instance details will be displayed:
- RunspaceId : rrrrrrrr-rrrr-rrrr-rrrr-rrrrrrrrrrrr
- ObjectId : oooooooo-oooo-oooo-oooo-oooooooooooo
- TenantId : tttttttt-tttt-tttt-tttt-tttttttttttt
- UserPrincipalName : focusrecordingbot@megacorp.onmicrosoft.com
- ApplicationId : 767f5014-af07-4861-805b-6f1fcb857e90
- DisplayName : FocusRecordingBot
The below URL is for POC or trial accounts. Please only use this registration link if you have been asked to do so by your onboarding team.
- UserPrincipalName: This the recording bots "name". It needs to be an email address with the same domain name as in your Microsoft Teams instance. This is recomended to be your "onmicrosoft" address but can be any domain in the account. For example “focusrecordingbot@yourdomain.onmicrosoft.com”.
- In this example we will use: focusrecordingbot@megacorp.onmicrosoft.com
- DisplayName: This is the name for the recording bot, it doesn't show to any users so can anything you wish. We recommend its the same as the part before the @ in the UserPrincipalName.
- In this example we will use: FocusRecordingBot
- ApplicationId: For production recording this will always be 1d438fe5-ac66-48c8-834b-04feae19721c
Once you selected a name as above please run the below command, replacing the UserPrincipalName and DisplayName with your selected names via the same PowerShell window used during setup:
New-CsOnlineApplicationInstance -UserPrincipalName focusrecordingbot@megacorp.onmicrosoft.com -DisplayName FocusRecordingBot -ApplicationId 1d438fe5-ac66-48c8-834b-04feae19721c
- Once the command has completed, the application instance details will be displayed:
- RunspaceId : rrrrrrrr-rrrr-rrrr-rrrr-rrrrrrrrrrrr
- ObjectId : oooooooo-oooo-oooo-oooo-oooooooooooo
- TenantId : tttttttt-tttt-tttt-tttt-tttttttttttt
- UserPrincipalName : focusrecordingbot@megacorp.onmicrosoft.com
- ApplicationId : 1d438fe5-ac66-48c8-834b-04feae19721c
- DisplayName : FocusRecordingBot
Make a note of the ObjectId as you need this in a later step
- Next we need to create the recording policy. You need to pass the following into this command:
- Description: A simple description for the policy
- In this example we will use: MegaCorp Compliance Recording Policy
- Tag: A single string for for the same policy. Note: this is passed as part of the description parameter
- In this example we will use: MegaCorpComplianceRecordingPolicy
As per our examples, it helps to include the company / organization name in the below descriptions for ny troubleshooting problems.
New-CsTeamsComplianceRecordingPolicy -Enabled $true -Description "MegaCorp Compliance Recording Policy" MegaCorpComplianceRecordingPolicy
Once this command has completed, the policy details should be displayed:
- Identity : Tag:MegaCorpComplianceRecordingPolicy
- ComplianceRecordingApplications :
- Enabled : True
- WarnUserOnRemoval : True
- Description : MegaCorp Compliance Recording Policy
- We now need to tell the policy about the Recording Bot (link the two together). You need to replace the below in the example:
- Id: This field is the ObjectID we took before.
- In our example above the objectId was oooooooo-oooo-oooo-oooo-oooooooooooo
- Parent: The tag you used in the above command.
- In our example above this was MegaCorpComplianceRecordingPolicy
Replace with the correct values and run the below command.
New-CsTeamsComplianceRecordingApplication -Parent "MegaCorpComplianceRecordingPolicy" -Id "oooooooo-oooo-oooo-oooo-oooooooooooo"
- Lastly we need to confirm the policy has been created correctly. Simply run the below command:
Get-CsTeamsComplianceRecordingPolicy
Set compliance or convenience options as you need
As detailed under the recording option for some compliance use cases, some companies are not permitted to make calls unless they are being recorded. This is the Microsoft default setting and it will prevent any calls if there is a loss of connection between a user and the recorder. It you wish to change this policy and use convenience recording follow the instruction below. If compliant recording if what you need, you can skip this section.
If you are not mandated by law to record your calls we recommended swapping to convenience recording using the below settings for all 4 policy options.
To update the settings, first we need to find the full Identity. The best way is to run the powershell below:
Get-CsTeamsComplianceRecordingApplication
If you get an error or are no longer logged in via powershell follow steps 1-5 of the PowerShell configuration steps.

You need to copy the full value after "Tag:" and pass it in as the identity property below:
- Identity: The value of ideally shown in the above powershell result.
- In out example we will use: MegaCorpComplianceRecordingPolicy/oooooooo-oooo-oooo-oooo-oooooooooooo
- Any of the options, there are 4:
- RequiredBeforeCallEstablishment - set this to $false to allow PSTN calls to continue to be made and received if the Bot is not reachable.
- RequiredBeforeMeetingJoin - set this to $false to allow Meeting to continue to be joined if the Bot is not reachable.
- RequiredDuringCall - Set this to $false to allow calls to continue if the Bot is not reachable during a call.
- RequiredDuringMeeting - Set this to $false to allow meetings to continue if the Bot is not reachable during a call.
You can add multiple options with the $false switch to the same line, in the below example we are adding all 4 options, this is recommended for true Convenience recording.
set-CsTeamsComplianceRecordingApplication -Identity MegaCorpComplianceRecordingPolicy/oooooooo-oooo-oooo-oooo-oooooooooooo -RequiredBeforeCallEstablishment $false -RequiredBeforeMeetingJoin $false -RequiredDuringCall $false -RequiredDuringMeeting $false
To test that these changes are saved, run the same command and you should see all the policy options are set as false.
Get-CsTeamsComplianceRecordingApplication

Groups and recorded users setup
With in the Azure portal, you need to configure a security group named "ClarifyGo Recorded Users" for user syncing purposes. Focus will sync and record any users in this group.
The part is easier to complete via the Microsoft Portal.
- Open your Microsoft 365 admin center: https://admin.cloud.microsoft/ ensure you are on the same tenant used above.
- Select Teams & Groups
- Select Active teams & groups
- Select Security groups
- Select Add a security group

- Give it the name: ClarifyGo Recorded Users and a description if you wish
- Press Next

- Followed by Create group on the second (Finish) page
- Once you see a green tick, press the Close button
Assign the policy to this group (recommended)
Users can be assigned on a per user basis however it is recommended to use the group approach described below so any users added to the group are automatically applied the policy. If you wish to use a per user method please contact support.
- Select the group you you just created above ClarifyGo Recorded Users from the Security groups tab.
- Once selected a section on the right will pop out
- You need the group UUID from the end of the URL.

Make sure you only copy the unique id (UUID) and nothing extra e.g. if the full url was https://ms.com/groups/groupDetails/ggggggg-gggg-gggg-gggg-gggggggggggg/1/test then we would only want the ggggggg-gggg-gggg-gggg-gggggggggggg section. We will use this in the example below.
- We are now ready to run the PowerShell command to link the two. As before, replace the example values with your valid ones:
- GroupId: This is the groupid you found in step 7 above
- In our example this is: ggggggg-gggg-gggg-gggg-gggggggggggg
- PolicyType: Always TeamsComplianceRecordingPolicy
- PolicyName: The policy name created earlier in this guide
- In this example we used MegaCorpComplianceRecordingPolicy
- Rank: Always 1
New-CsGroupPolicyAssignment -GroupId ggggggg-gggg-gggg-gggg-gggggggggggg -PolicyType TeamsComplianceRecordingPolicy -PolicyName MegaCorpComplianceRecordingPolicy -Rank 1
- Lastly lets check its all setup correctly.
Get-CsGroupPolicyAssignment -PolicyType TeamsComplianceRecordingPolicy
This should list the group we just made. To check that a specific user has the correct policy assigned, you will need to run the following command, changing the email as required.
Get-CsUserPolicyAssignment -identity useremail@companydomain.com -PolicyType TeamsComplianceRecordingPolicy
UI deployment method
The team are committed to making user management as simple as possible, as a result a Focus integrated method for user configuration is being developed. This method will be available by the end of 2025 and will alow for configuration without the need to run PowerShell scripts.
Adding or removing users
Now that the policy is linked you can now add (or remove) any users to be recorded as members to the ClarifyGo Recorded Users security group in azure.
All recorded users should be added to this group as Members, owners of the group do not sync and will not be recorded.
Once a group policy assignment is created, the policy assignment will be propagated to the members of the group, including users that are added to the group after the assignment was created. Propagation is done by Microsoft in the background and the time of the initial policy assignments to members of the group varies based on the number of users in the group. When using group policy assignment, the recommended maximum group membership size is 50,000 users per group.
Currently recorded users will only show in the Focus Subscribers Subscribers sections once they have made a call. An update before the end of 2025 will automatically sync the recorded users via the created group.